The Gridview allows you to add a number of different types of fields.
The TemplateField allows more flexibility in that you can customize the field to a greater degree.
In the example source above, a TemplateField has been used in the Gridview to include an ImageButton. This is a good result, as by default, an ImageButton cannot be included.
This ImageButton has its CommandName property set to 'Increase' and it's CommandArgument property set to the 'CartID' field on the Datasource (the list the gridview is bound to). It also has an ImageURL which is the path to the image to be displayed on the button.
Here is the view of the Gridview fields from within the Edit Column dialogue. There are a total of 4 templateFields used in this example - Total, Increase, Decrease & Remove. Notice that the TemplateFields have a slightly different icon.
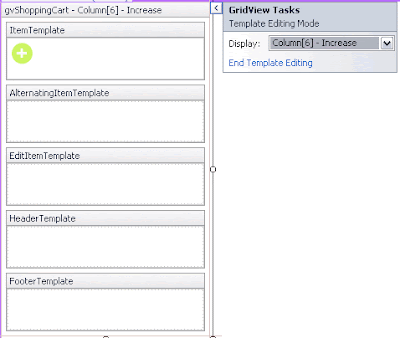
In order to edit the contents of the TemplateField, you will need to select the 'Edit Templates' option from the Gridview tasks menu.
Select the template you wish to edit and it will open out for you.
You will notice there are several regions in the template, in this example, I have placed an ImageButton in the ItemTemplate.
Once you have named the control (via the normal Properties pane) and set the ImageURL, open the Tasks menu and select 'Edit DataBindings'.
There are a number of settings we can play with here.
Select the CommandArgument property from the 'Bindable Properties' list and type 'Bind', followed in parenthesis by the field on the datasource to bind.
Check the 'Show all properties' box and now select the CommandName property from the 'Bindable Properties' list and type a name for the command.
Click OK and then from the Gridview tasks menu, select 'End template editing'.
The image below shows the rendered out Gridview.
When the 'Increase' button is clicked in the Gridview, this causes the RowCommand event of the Gridview to fire.
The CommandName string & CommandArgument value are passed to this event for further processing:
Remember that in this example, the CommandName string is 'Increase' & the CommandArgument is holding the CartID.
One thing you see often in this example is the use of 'e'. If you take a look at the parameter list for the event, you can see that the 2nd parameter is called 'e'.
'e' represents a collection of values that hold information about the state of the gridview - including which button was clicked and any CommandName and CommandArgument properties.
As you can see, the first thing happening in this code is the getting of the CartID from the CommandArgument. This is stored in an integer variable.
The next thing you will notice are a series of If statements to determine what the CommandName of the button was. From there, the appropriate code is executed and the CartID is passed along.


No comments:
Post a Comment