This event fires once the Gridview has finished Databinding - that is, the Gridview has been populated with all of the data on the Datasource.
Don't get it mixed up with RowDataBound event which fires after each row has finished binding.
This is a great place to run any code that needs to wait until the Gridview is finished binding - perhaps we have been accumulating the values in each row, as they bind & wish to write them out at the end.
"BaseDataBoundControl.DataBound Event (System.Web.UI.WebControls)" ( http://bit.ly/gXWo3S )
Tuesday, April 26, 2011
Finding controls in the GridView
Because a GridView renders out multiple rows, each of them contain controls with identical names. Finding the right control requires a trick.
For instance, in the RowDataBound/DataBound event, if we were looking for a particular label so that we could write a value to it 'on the fly', we would use the following code:
The CTYPE function is a conversion function. In this case, it will return all of the data associated with the label we are trying to locate, as a Label object. Once located, we can manipulate this particular instance.
For instance, in the RowDataBound/DataBound event, if we were looking for a particular label so that we could write a value to it 'on the fly', we would use the following code:
Dim lblItemotal As Label = CType(e.Row.FindControl("lblItemTotal"), Label)
The CTYPE function is a conversion function. In this case, it will return all of the data associated with the label we are trying to locate, as a Label object. Once located, we can manipulate this particular instance.
GridView TemplateField
The Gridview allows you to add a number of different types of fields.
The TemplateField allows more flexibility in that you can customize the field to a greater degree.

In the example source above, a TemplateField has been used in the Gridview to include an ImageButton. This is a good result, as by default, an ImageButton cannot be included.
This ImageButton has its CommandName property set to 'Increase' and it's CommandArgument property set to the 'CartID' field on the Datasource (the list the gridview is bound to). It also has an ImageURL which is the path to the image to be displayed on the button.

Here is the view of the Gridview fields from within the Edit Column dialogue. There are a total of 4 templateFields used in this example - Total, Increase, Decrease & Remove. Notice that the TemplateFields have a slightly different icon.

In order to edit the contents of the TemplateField, you will need to select the 'Edit Templates' option from the Gridview tasks menu.
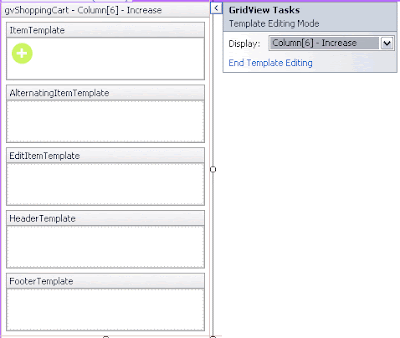
Select the template you wish to edit and it will open out for you.

You will notice there are several regions in the template, in this example, I have placed an ImageButton in the ItemTemplate.
Once you have named the control (via the normal Properties pane) and set the ImageURL, open the Tasks menu and select 'Edit DataBindings'.

There are a number of settings we can play with here.
Select the CommandArgument property from the 'Bindable Properties' list and type 'Bind', followed in parenthesis by the field on the datasource to bind.

Check the 'Show all properties' box and now select the CommandName property from the 'Bindable Properties' list and type a name for the command.
Click OK and then from the Gridview tasks menu, select 'End template editing'.
The image below shows the rendered out Gridview.

When the 'Increase' button is clicked in the Gridview, this causes the RowCommand event of the Gridview to fire.
The CommandName string & CommandArgument value are passed to this event for further processing:

Remember that in this example, the CommandName string is 'Increase' & the CommandArgument is holding the CartID.
One thing you see often in this example is the use of 'e'. If you take a look at the parameter list for the event, you can see that the 2nd parameter is called 'e'.
'e' represents a collection of values that hold information about the state of the gridview - including which button was clicked and any CommandName and CommandArgument properties.
As you can see, the first thing happening in this code is the getting of the CartID from the CommandArgument. This is stored in an integer variable.
The next thing you will notice are a series of If statements to determine what the CommandName of the button was. From there, the appropriate code is executed and the CartID is passed along.
The TemplateField allows more flexibility in that you can customize the field to a greater degree.

In the example source above, a TemplateField has been used in the Gridview to include an ImageButton. This is a good result, as by default, an ImageButton cannot be included.
This ImageButton has its CommandName property set to 'Increase' and it's CommandArgument property set to the 'CartID' field on the Datasource (the list the gridview is bound to). It also has an ImageURL which is the path to the image to be displayed on the button.

Here is the view of the Gridview fields from within the Edit Column dialogue. There are a total of 4 templateFields used in this example - Total, Increase, Decrease & Remove. Notice that the TemplateFields have a slightly different icon.
In order to edit the contents of the TemplateField, you will need to select the 'Edit Templates' option from the Gridview tasks menu.

Select the template you wish to edit and it will open out for you.
You will notice there are several regions in the template, in this example, I have placed an ImageButton in the ItemTemplate.
Once you have named the control (via the normal Properties pane) and set the ImageURL, open the Tasks menu and select 'Edit DataBindings'.

There are a number of settings we can play with here.
Select the CommandArgument property from the 'Bindable Properties' list and type 'Bind', followed in parenthesis by the field on the datasource to bind.

Check the 'Show all properties' box and now select the CommandName property from the 'Bindable Properties' list and type a name for the command.
Click OK and then from the Gridview tasks menu, select 'End template editing'.
The image below shows the rendered out Gridview.

When the 'Increase' button is clicked in the Gridview, this causes the RowCommand event of the Gridview to fire.
The CommandName string & CommandArgument value are passed to this event for further processing:
Remember that in this example, the CommandName string is 'Increase' & the CommandArgument is holding the CartID.
One thing you see often in this example is the use of 'e'. If you take a look at the parameter list for the event, you can see that the 2nd parameter is called 'e'.
'e' represents a collection of values that hold information about the state of the gridview - including which button was clicked and any CommandName and CommandArgument properties.
As you can see, the first thing happening in this code is the getting of the CartID from the CommandArgument. This is stored in an integer variable.
The next thing you will notice are a series of If statements to determine what the CommandName of the button was. From there, the appropriate code is executed and the CartID is passed along.
ImageButton Class
"ImageButton Class (System.Web.UI.WebControls)" ( http://bit.ly/hguk2A )
Properties of note:
ImageURL: Gets or sets the URL that provides the path to an image to display
CommandArgument: Specify a value that can be programmatically read by onCommand event handlers - such as the Gridview. Think, passing a value to a parameter. Optional.
CommandName: Specify a string that can be programmatically identified by onCommand event handlers - such as the Gridview RowCommand event. Optional
FormatCurrency Function
To format a decimal value as currency for output:
Also see: Format currency in GridView
lblLabel.Text = FormatCurrency(decPrice)
Also see: Format currency in GridView
Databiding a GridView
A gridview can 'databind' to any collection/list of objects.
Properties of note:
DataSource - the collection to bind to
DataKeyNames - an array of the field on the datasource to use as the key/identifier (often the Primary Key, in the case of database results). Optional.
Databind - causes the Gridview to bind with the datasource - starts executing other events such as RowDataBound, etc.
In the example above, the getCart method of the myModel object, returns a list. The CartID feild is used as the DataKeyName.
Properties of note:
DataSource - the collection to bind to
DataKeyNames - an array of the field on the datasource to use as the key/identifier (often the Primary Key, in the case of database results). Optional.
Databind - causes the Gridview to bind with the datasource - starts executing other events such as RowDataBound, etc.
Dim myModel As New ModelFacade
gvShoppingCart.DataSource = myModel.getCart()
gvShoppingCart.DataKeyNames = New String() {"CartID"}
gvShoppingCart.DataBind()In the example above, the getCart method of the myModel object, returns a list. The CartID feild is used as the DataKeyName.
Calculating GST
To calculate how much GST to add: Multiply by 0.1
To add GST to arrive at a total price: Multiply by 1.1
To calculate how much GST is included in a price: Divide by 11
To calculate how much the price was before GST: Divide by 1.1
decSubTotal = decSubTotal / 1.1
From "Calculate GST in the Blink of an Eye - For Dummies" ( http://bit.ly/efOjUP )
decGST = decSubTotal * 0.1
To add GST to arrive at a total price: Multiply by 1.1
decTotalPrice = decSubTotal * 1.1
To calculate how much GST is included in a price: Divide by 11
decGST = decTotalPrice / 11
To calculate how much the price was before GST: Divide by 1.1
decSubTotal = decSubTotal / 1.1
From "Calculate GST in the Blink of an Eye - For Dummies" ( http://bit.ly/efOjUP )
Subscribe to:
Posts (Atom)